Adding a New Benefit Earning to Employee Profile
This step describes how to bring in all current active enmployee records with the current profile settings to process payroll. For more information about payroll processing, see Processing Payroll.
From the Payroll Posting page, click the Step 1: Begin Payroll tab, if needed.
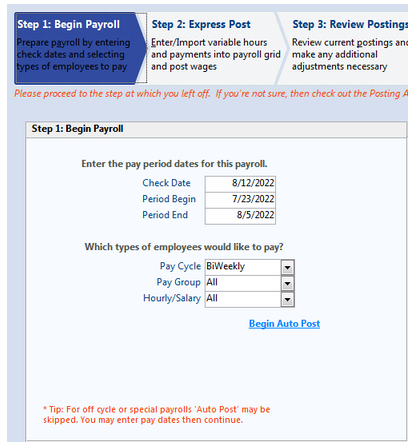
Update the following fields.
|
Check Date |
Ensure that the date when payroll checks are to be processed is accurate. |
|
Period Begin |
Ensure that the pay cycle beginning and end dates are accurate. |
|
Period End |
|
|
Pay Cycle |
If multiple pay cycles exist, click the list and select the correct pay cycle. Otherwise, leave as default. |
|
Pay Group |
If only employees for a specific pay group is brought into the payroll, click the list and select the desired group. Otherwise, leave as All. |
|
Hourly/Salary |
If only hourly or salaried employees should be brought into the payroll, click the list, and select Hourly or Salary. Otherwise, leave as All. |
When finished, click the Begin Auto Post link. The Get AutoPost ACH Option window displays.
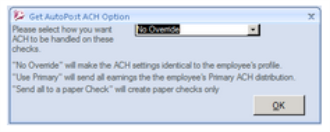
Click the drop-down list and select the desired ACH option and click OK.
-
No Override - bring in all employee pay allocations to the payroll posting.
-
Use Primary - bring in only pay allocations that are set as Primary on the employee profiles.
-
Send All to a paper Check - create paper checks for all employees.
Note:
No Override is the option that is used most frequently.
An AutoPost Complete confirmation window appears. Click OK.